Ultimate Beginner’s Guide to Rook Piercings
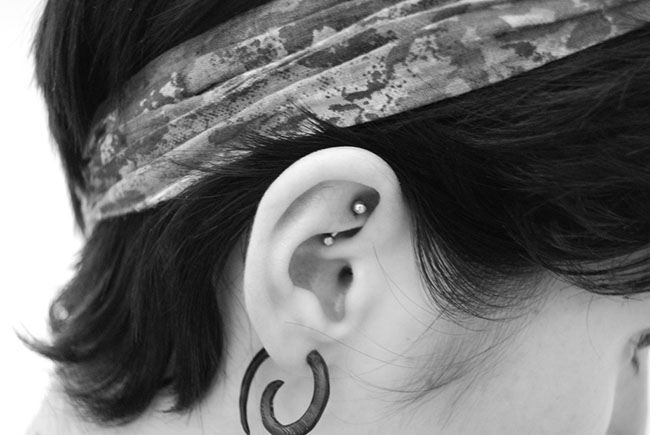
Gorgeous Organic Spiral Hanger With Rook
What is a Rook Piercing?
Rook piercings are piercings done typically in the upper area of the antihelix part of the ear (the curved inner part), just above the tragus. However, any spot along the antihelix can be pierced. Arguably a cooler piercing than a tragus, rook piercings are versatile and offer a wide range of jewelry to choose from; whether it be bars, captive bead rings, or curved bar bells, the possibilities are almost endless! See section 5 for more about the different types of jewelry and material used for rook piercings.

Now to the interesting part. How exactly is the antihelix pierced? Honestly the procedure for this type of piercing is relatively short; you could get it done during your lunch break. However it is a highly technical procedure and one of the more complicated of the cartilage piercings. Seeking a professional to carry out the procedure is definitely recommended.
The first step in the procedure will be to clean and sterilize the entire ear with alcohol. Two dots will be drawn onto the ear at the two points of insertion. A gauge (size of the gauge depends on the thickness of the cartilage) will then be inserted into the top dot, and through to the other end of the antihelix.
A hollow needle will often be used to intercept the gauge to prevent the discomfort of being prodded by the sharp end of it, though sometimes a rubber stopper may be used. The final and best step is the insertion of the jewelry. Using the gauge as a guide, the piercer will slowly slide the jewelry in and secure the ball on the end.
The cost of a rook piercing can range from here to here, depending on certain factors such as mall shops or independent body shops who specialize in this type of earring procedure. Location also plays a big part, differing from state to state.
Rook Piercing Pain…ouch?
Pain, of course is subjective. Just like any other cartilage piercing, a little pain is to be expected. Now truthfully, the general consensus for rook piercings has been that they can be one of the most painful piercings, but don’t be discouraged! One person’s pain, may feel like nothing to you. Many people have even claimed that the pain doesn’t really start until the healing process, which we’ll get to in a bit.
Men and women don’t seem to experience rook piercing pain differently; it really comes down to the individual’s own pain threshold. Both genders have described the initial piercing process as either painful, not painful at all, or as “pressure” as the needle breaks through the hard cartilage.
Compared to other cartilage piercings, the rook is probably the most painful only because the needle has to penetrate through two layers of cartilage, as opposed to a tragus piercing which only has to go through one. Though the initial rook piercing may be more painful than a tragus piercing, the pain during the healing process is significantly lower for a rook piercing. This is mainly due to the positioning of the piercing. The rook piercing is more protected, being more towards the inside of the ear and the jewelry used if often easier to clean.
Compared to a daith piercing, the rook is a walk in the park, according to people with both areas pierced. The daith piercing is a piercing along the helix part of the ear (the outer curve), normally placed close to the tragus and inner ear.
On a scale of 1 to 10, with 10 being the most painful, initial rook piercings fall somewhere between 1 and 6.
As mentioned before a lot of the pain follows afterwards during the healing process, especially if the piercing isn’t being taken care of properly.
But hey, no pain no gain.
Rook Piercing Healing Time
The average healing time for a rook piercing is anywhere between 12 and 18 months. Because the piercing is in such a sensitive region, even the slightest bump of the ear could irritate it for days. However, there are plenty of ways to heal safely and as quickly as possible. Follow these tips and you’ll be test driving cool new jewelry in no time!
The first and most important tip is to make sure you choose the right jewelry to start with; and then not touch it or change it until the antihelix has healed completely and you have your piercer’s go-ahead to change it.
The three highly recommended starters jewelry are captive bead rings (CBR), mini curved barbells, or circular barbells. These types of jewelry are easy to clean and won’t irritate the piercing the way a piece of jewelry with a charm or odd shape will. There will be more than enough time to play around with different jewelry when the ear has healed!
As for the material of the earrings, two types are recommended: surgical steel and titanium. There are a few differences that separate the two materials that will likely affect your buying decision. For starters surgical steel contains traces of nickel, which can sometimes cause irritation, especially for those who are prone to allergic reactions to earrings. For this reason, surgical steel is usually more affordable than titanium.
As titanium is an element, it’s far less reactive than surgical steel. As a result, titanium won’t cause allergic reactions and will even aid in the overall healing process. Aesthetically, titanium comes in different colors, whereas surgical steel does not. Though titanium is the pricier option, you’d be looking at a much smoother healing process.
There are a lot of do’s and don’ts when it comes to healing a rook piercing. It’s crucial to be wary of them.
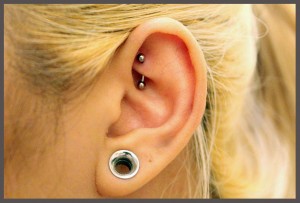
Beautiful and subdued example of a rook and double flared stainless steel tunnel.
First off for the love of rook, DO NOT touch the piercing! Sometimes piercers for other cartilage piercings such as a helix piercing will recommend playing with the jewellery, “It’s good for the piercing!”
No, it’s not. Stop touching. The constant movement of the piercing will break the skin cells that were just trying to heal, thus hindering the healing. Besides if you absolutely need to touch the piercing, you’d better make sure your hands are as sterile as a hospital.
Speaking of sterile, it is incredibly important to wash the piercing at least twice a day until it’s completely healed. This will help the skin cells regenerate and will help reduce risk of infection. The best way to go about it is to wash the piercing with a sea salt soak. This can be done at home if you’e the DIY type. Start by mixing a glass of pre-boiled water with about a teaspoon of non-iodized salt. Then, soak your ear using a cotton ball for 10 to 15 minutes.
If you would be more comfortable buying a professional salt solution, your best bet would be to buy H2Ocean sea salt spray. It is relatively cheap and it’s a convenient spray. It comes highly recommended by its users.
There are a couple of don’ts to adhere to while the piercing is healing. One big one is to try to limit use of the ear in question. This means don’t use the phone with the pierced ear, don’t sleep on it, and don’t use big headphones.

For girls and boys with particularly long hair, be careful not to bump the piercing when brushing or pulling your hair back. Hair can easily snag the jewellery causing terribly uncomfortable pain. Also be cautious when removing clothes, necklaces, and anything else that may get caught in the earring.
Rook Piercing Infection and Cleaning Tips
In this next section we’ll be looking at what to do if your rook becomes infected or causes any type of irritation. As with pain, some people experience bumps and puss, while other go on living life without a care. But we’re not here for them, we’re here for you. These next tips will hopefully help in soothing any discomfort that may occur.
The truth is infections are rare. Most commonly people will have bumps, lympth fluid (sometimes a milky white color), and scabby skin around the piercing but this doesn’t always mean it’s an infection.
Keloids, otherwise known as the dreaded bumps are the most common. These bumps are not infectious unless they develop within the first 48 hours of first receiving the piercing, in which case it’s best to visit your piercer. Keloids are simply your body’s natural healing reaction to a puncture wound. Lympth fluid and everything. These bumps can also be a result of lack of cleaning or excessive touching or playing with the jewellery.
Luckily there’s an easy relatively easy fix (in my opinion): tea tree oil. Though there are a number of specialty products available to cure keloids, tea tree oil has just as good reviews at a more affordable price! It can be found in any drugstore and in numerous online stores (i.e. Amazon). The best way to go about it is to apply 1-2 drops of the oil onto the keloid about 2-3 times a week using a cotton swab. Do not over dry the bump! This will extend the healing process (which roughly takes 2-3 weeks) and produce uncomfortable scabbing.
For other pains such as swelling and soreness, a few remedies are available. One would be the sea salt soak, as found in the previous section but sometimes the piercing requires a little extra care. Say you slept on your piercing or bumped it accidentally; for immediate relief, a bactine spray is recommended. 1 or 2 sprays and you’ll feel the pressure of the throbbing and soreness gone! The catch is that this is only a temporary solution, it is crucial to continue cleaning with the soak afterwards. Another fix for pain, which will take a little longer to take effect, is an ibuprofen such as Advil.

For infections, you’re best off going to your piercer to have them give you their professional assessment, but in the meantime continue to wash it regularly several times a day, and change your pillow case frequently.
Rook Piercing Jewelry
Now that you’re healed and you’ve consulted your piercer it’s time to retire the boring “healing jewelry”. Let the fun begin! There are a number of colours, designs, and materials to choose from for your new rook piercing that can be found at any body jewelry store. But for a better buy and a wider range of choice, Amazon (my preferred choice) and EBay have quite the selections,
First let’s talk about materials. A number of lower end jewelry can be made of poor quality materials. Even though your piercing is healed, that doesn’t mean it won’t react to cheap materials. It’s best to stick to surgical steel, titanium, silver, and gold materials. Trust me when I say that this won’t limit your jewelry search in the slightest. As mentioned earlier, titanium comes in a variety of colors (blues, pinks, greens, purples). Surgical steel generally comes in a standard steel color, but can sometimes come with a more rustic tint. Gold materials generally come in gold color or rose gold.
As for the actual jewelry, several types are available. Bars are the most common type of jewelry for rooks because of their versatility. There are straight barbells, curved barbells, circular barbells (or horseshoe barbells), and industrial bars (worn through two piercings on the antihelix and concha or helix) which are most popular for rooks. There are also captive bead rings, and if you have a cozy, smallish rook, you can try to see if a stud would fit.
Besides coming in a variety of colors, rook jewelry can come with charms as well such as flowers, hearts, feathers, and stars on barbells. Some jewelry even comes with dangling charms. These styles are more popular with ladies, while men seem to opt for either a classic bar or different colored bars.
On the other hand, though rings aren’t generally accompanied by charms, you can buy them in different shapes other than circular. Some come as heart shaped or star shaped for that extra uniqueness.
It’s important when buying new jewelry that it comes in the same sized gauge as you had originally pierced. Trying to shove a 16 gauge bar through a 14 gauge hole is never a fun time. The good news is that most styles come in both gauges!
Prices vary based on style and material, from gold probably being the most expensive buy, to surgical steal being the cheapest. However it’s unlikely that any will break the bank (unless of course you decide to splurge on real diamond charms). The best shopping can be done online as the stores have competitive and often the most affordable prices.
If you’ve enjoyed this article, please share. Questions can be left in the comments section below. Thanks for reading!
Okay so you say “it’s not fun to shove a 14g bar through a 16g hole” well, that’s what I did and I’m hoping it will be okay? I was very sterile with it and the new jewelry is stainless steel. After 3 days it looks fine, but it still hurts as if it’s 3 days after I got it pierced (7 years ago!). Really soar. I’ve been treating it as if it’s a new piercing and keeping it clean. Was this a super bad idea or will it be fine if I wait it out? The deed itself didn’t hurt that bad but I had to manipulate it around for a while to screw the top on. I think that’s why it’s so soar
Sorry for such a late reply Crystal (health), but I assume you’re fine now? The pain would have been through the manipulation as the site of insertion is trying to heal. As long as you weren’t seeing pus and major areas of inflammation you should be fine.
If problems persist after doing your basics such as sea salt soaks (this will help flush out lympt fluid and should stop crusting as well as keeping the area well irrigated) you should maybe consider popping along and having a chat with your local piercer, if there is one in the area. Avoid the mall shops.
Also remember you can also see your doctor if you feel complications have become too bad. Hope you’re doing well.